This post contains affiliate links. If you buy through them, we may earn a commission at no extra cost to you. Read our disclosure.
Disclosure: This article contains affiliate links. If you sign up through one of them MacReview may earn a commission at no extra cost to you. We only recommend tools we’d use ourselves.
Your iPhone has a document scanner better than most standalone hardware sold a decade ago: edge detection, perspective correction, multi-page PDFs, built into iOS for years, and no third-party app required. Most people photograph documents instead and end up with skewed 4 MB JPEGs of a passport in the camera roll.
The people who do scan hit the same two walls: they can’t find the file afterward, and it’s too big to email. Here’s every method Apple gives you, then where each one actually puts the result.
Every way to scan, with no extra app
1. Notes: fastest for one-offs
Open or create a note → tap the attachment (paperclip) button → Scan Documents. In Auto mode it captures on its own, or tap the shutter or a volume button. Drag the corners to adjust, tap Keep Scan, then Save. In iOS 26 the scan interface added flash control and image filters, which helps with glossy paper and low light.
Use it for: something you need right now. Not for your permanent archive: see the locked-notes warning below.
2. Files: best for building an archive
Open Files → tap More (•••) → Scan Documents → scan → Save → choose where it goes.
This saves a PDF straight into the folder you pick, with no later step of exporting out of Notes. Scan directly into a family-documents folder in iCloud Drive.
Use it for: everything you’re filing deliberately.
3. Continuity Camera: scanning into a Mac
You can drive your iPhone’s camera from the Mac. In a supported app, right-click where you want the scan to land → Insert from [iPhone] → Scan Documents, or use the File or Insert menu → Insert from iPhone or iPad → Scan Documents. Capture, tap Keep Scan, then Save, and the PDF appears on the Mac.
Supported apps: Finder, Mail, Messages, Notes, Freeform, TextEdit, Pages 7.2+, Numbers 5.2+, and Keynote 8.2+. Both devices need Wi-Fi and Bluetooth on, signed into the same Apple Account with two-factor authentication.
Use it for: batch sessions at a desk, filing as you go.
4. Preview with a real scanner: best quality for a big stack
With a flatbed or a document feeder, Preview on the Mac drives it: File → Import from Scanner → [your scanner]. Set Scan Mode to Flatbed or Document Feeder, choose Kind (Text, Black & White, or Color), enable Duplex for two-sided pages, and set the destination. To append a page to an open document: Edit → Insert → Page from Scanner.
Use it for: bulk digitization. A feeder does in twenty minutes what your phone takes two hours.
5. Preview on iPhone and iPad, added in iOS 26
Preview arrived as an app on iPhone and iPad in iOS 26, released in September 2025, and it scans documents to PDF as well as editing and signing them, instead of leaving that work buried in Markup. It collapses the old three-app route of scanning in Notes, exporting to Files, then signing in Markup.
Use it for: anything you scan, fill in, and sign back, which is most of what schools, insurers, and landlords send.
Where your scans actually save
Every method answers this differently, and none of them is the Photos library, where most people look first.
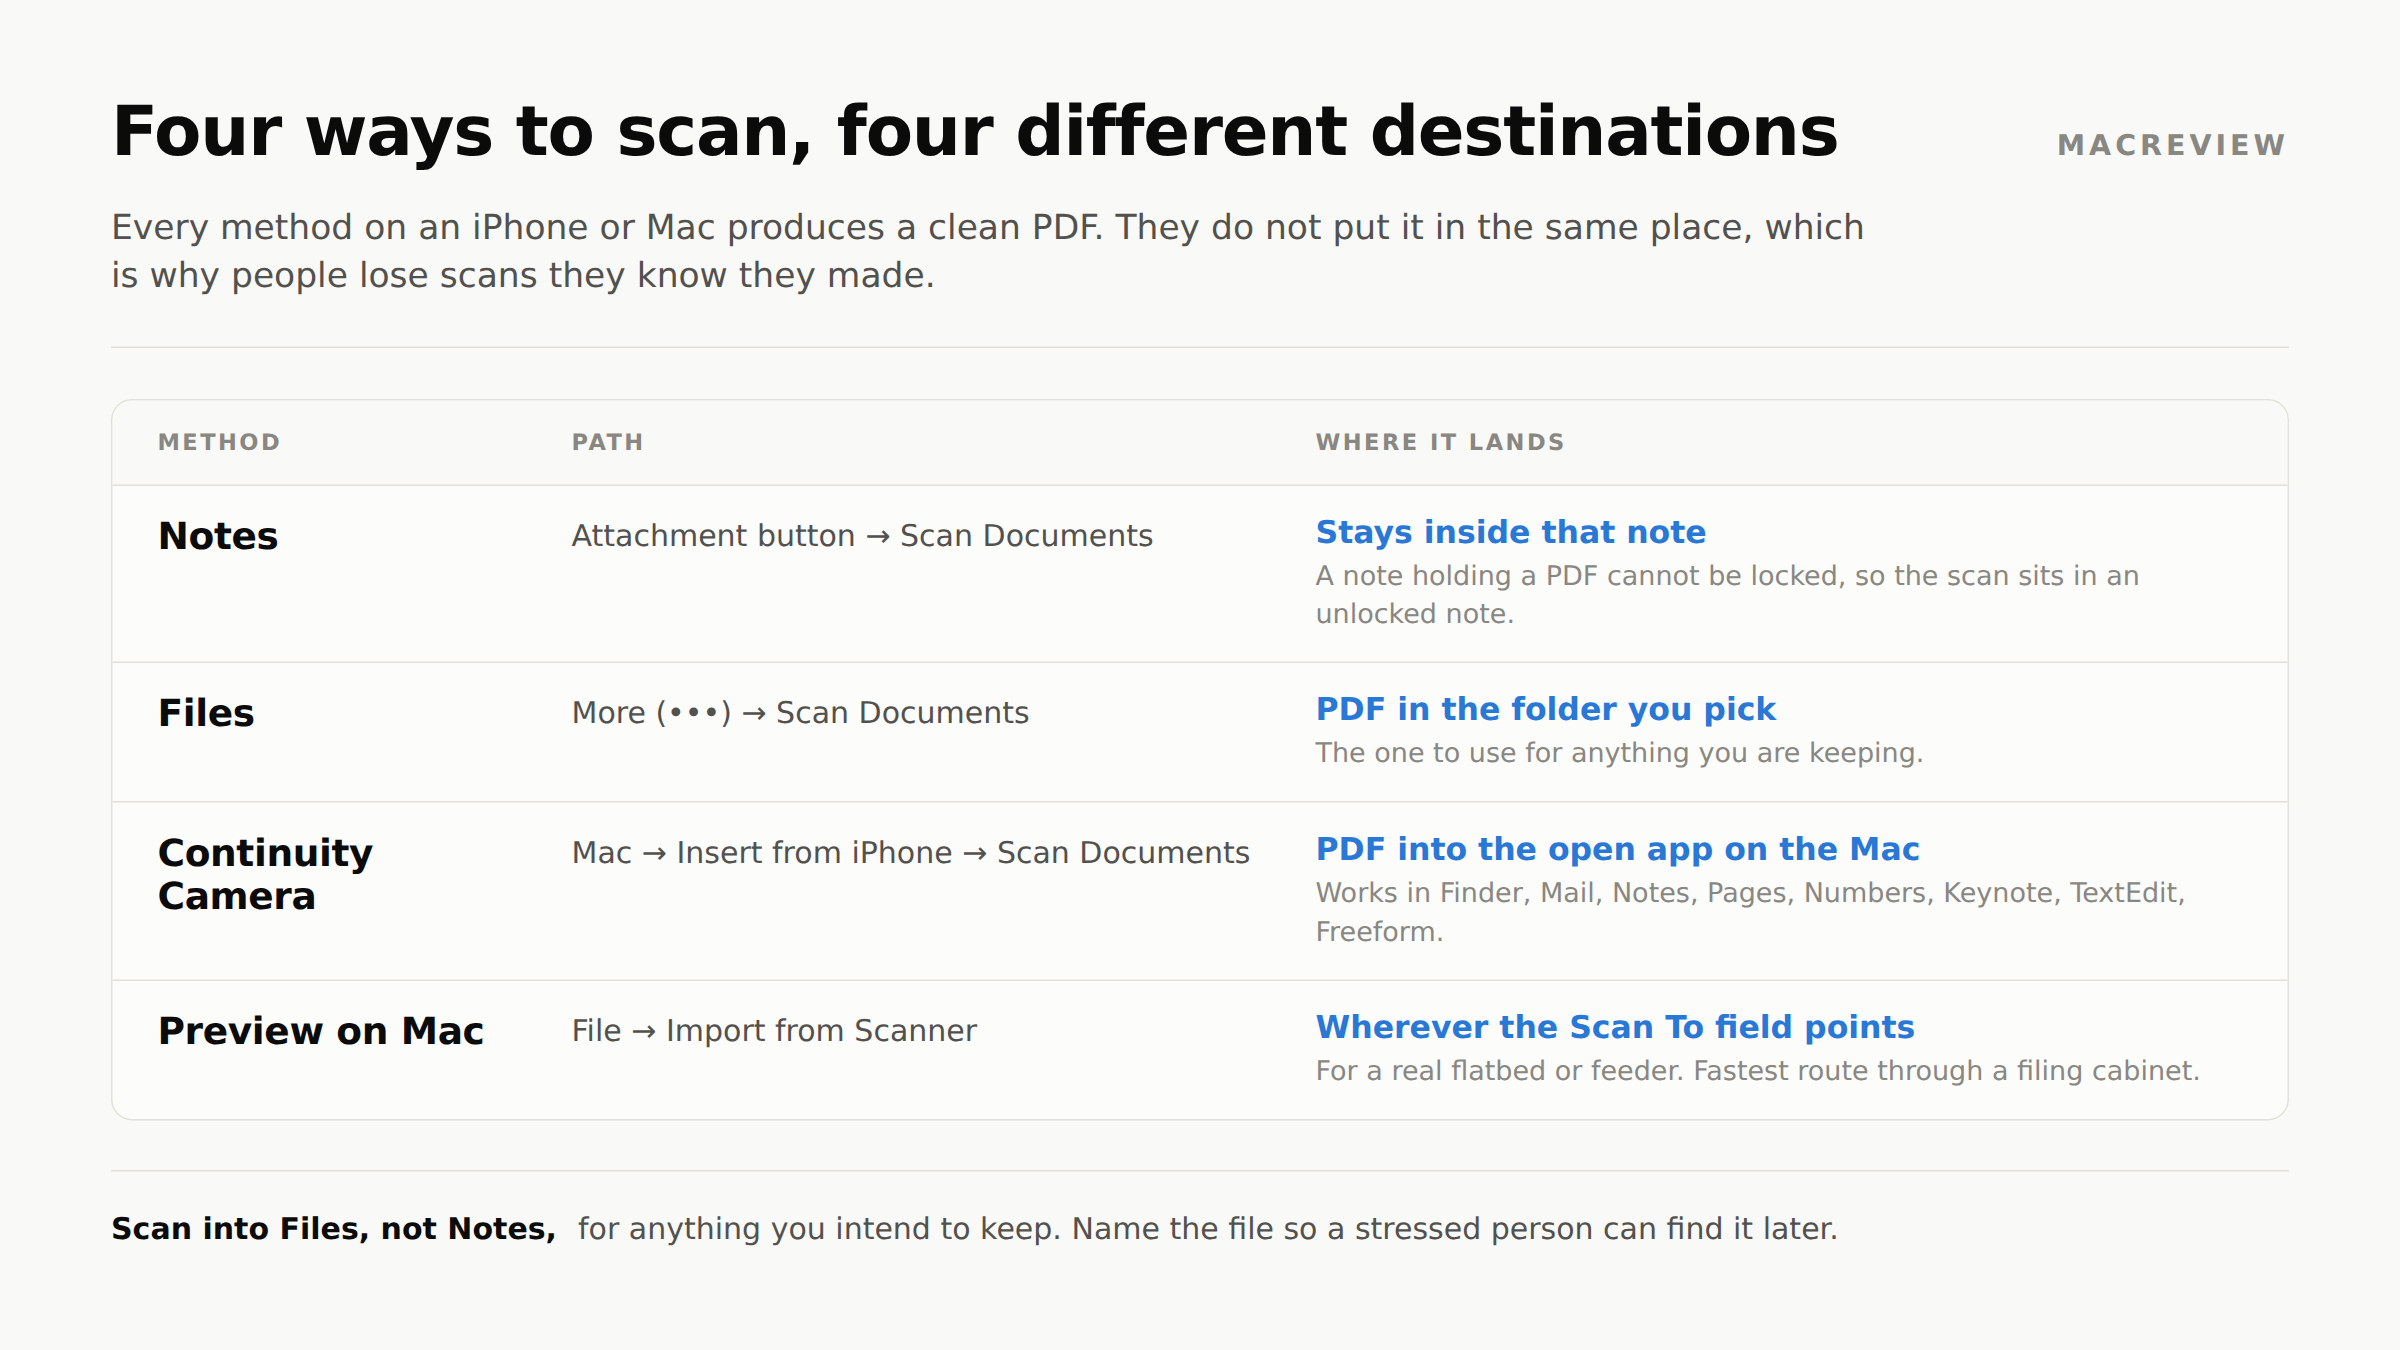
| Method | Where the file lands |
|---|---|
| Notes | Inside the note, in whichever Notes folder and account was open |
| Files | As a PDF in the folder you chose on the Save screen |
| Continuity Camera | The Mac document or Finder window you started from |
| Preview with a scanner | The destination folder set in the scan options |
| Share sheet | A separate copy wherever you sent it, original left in place |
A scan in Notes is not a file yet. It lives inside the note, so it won’t appear in Files or in a folder you can back up. To make it a document, open the scan, share it, and save it to Files. Apple recommends setting Notes up with iCloud or with notes saved on the device, and says plainly that many Notes features do not work with other email providers.
Files puts it exactly where you told it to, which is the problem. The Save screen suggests a location, so a fast tap can land a scan in On My iPhone rather than iCloud Drive, or in the folder you used last. Sort by date, or check Recents, to find it.
Continuity Camera delivers to the Mac, not the phone. Apple states it outright: scans you take on your iPhone and iPad are not saved on the device.
The share sheet copies, it doesn’t move. The original stays put, and the copy won’t update when you edit it.
Already lost one? Search Files by name, check Recents, and search Notes for text printed on the page.
Why your scans are so large, and how to shrink one
Three things drive the size. Color mode is the big one: Color stores far more per page than Text or Black & White. Page count is second, because every page carries its own image, so a twelve-page lease is roughly twelve times a one-page scan. Detail is third: glossy stock, dense small print, and photographs all resist compression.
To get under an email or portal limit:
- Check what the limit actually is first, and work to that number.
- Rescan in Black & White or Text mode. The largest single reduction available. The trade-off is the one below: those modes can wash out seals and signatures, so use them for statements, not for anything whose legitimacy depends on how it looks.
- Split it into one document per PDF. Most upload limits are per file, and you should file them separately anyway.
- Flatten and re-export on a Mac. Preview can export a PDF through a Quartz filter that reduces file size (File → Export, then choose Reduce File Size in the Quartz Filter pop-up menu). The same Export sheet also offers Create Linearized PDF, Optimize images for screen, and Save images as JPEG. Read the smallest print on the result before sending.
- Compress it on the phone. In iOS 26, open the PDF in Preview, tap the chevron next to the filename, tap Export, pick a format, then use the slider to bring the size down. No Mac required.
- Drop pages rather than quality when a seal has to stay in color. Send the declaration page, not the whole policy.
When scanning fails
Scan Documents is greyed out or missing. It’s a camera feature, so start with anything that blocks the camera. On a work, school, or previously managed device, a configuration profile is the documented culprit: Apple’s device management restrictions make cameras unavailable and remove the Camera icon from the Home Screen outright. Screen Time can also hide built-in apps and features, though Apple does not name Camera specifically in its parental controls documentation. Then check you’re looking in the right place, since the option sits behind the attachment button in Notes and the More (•••) menu in Files, and Apple warns that many Notes features do not work when the account belongs to another email provider.
The scanner won’t capture. Auto mode needs four page edges and contrast against the background, so a white page on a white table, a page running past the frame, or dim light will leave it hovering. Move to a contrasting surface, get the whole page in frame, add light or use the iOS 26 flash control, wipe the lens, and switch to Manual if Auto keeps hesitating. Close any other app holding the camera. Neither problem has a documented Apple fix, so a restart is the honest last resort.
Four things that make scans usable later
Name files like a stressed person will read them. Homeowners-Policy-StateFarm-2026.pdf beats Scanned Document 4.pdf. You’re writing for yourself at 2 a.m. in a hotel room after a flood.
Scan in Color for anything with a seal or signature. Text mode is smaller and fine for statements, but it can wash out notary seals, embossing, and colored signatures: exactly the marks that make a document look legitimate to whoever you send it to.
One document per PDF. You’ll need to send exactly one policy to exactly one insurer someday.
Don’t assume your scans are searchable. Live Text recognizes text in images well, but Apple doesn’t document scanned PDFs in Notes or Files as being OCR’d and indexed for full-text search, and users report inconsistent results. Test it with your own files before you rely on it. File names are doing the real work.
Where to put them, and one trap
You cannot lock a note that contains a PDF. Apple’s note locking excludes notes containing PDFs, audio, or video, and every scan you just made is a PDF, so your scanned documents sit in unlocked notes. Locked Notes works for typed text; it does not work for the thing most people want it for.
So scan into Files, not Notes, then turn on Advanced Data Protection so iCloud Drive is end-to-end encrypted. We walk through that in what Apple’s iCloud encryption actually covers.
And don’t email scans to yourself. iCloud Mail is never end-to-end encrypted, even with Advanced Data Protection on. It’s one of three categories (with Contacts and Calendars) Apple keeps accessible for protocol compatibility. An inbox is the worst place your Social Security card can live.
When documents have to reach other people, iCloud Drive’s sharing is all-or-nothing per folder. Trustworthy uses per-document permissions instead, so you can share one insurance declaration without exposing anything else. It’s SOC 2 Type 2 certified with AES-256 encryption and MFA on by default, and it takes these scans directly. The free tier is single-user with 2 GB; sharing starts at $10/month billed annually.
What to scan: the weekend list
Work in this order and stop when you run out of energy. It’s ranked so that quitting early still leaves you better off.
Tier 1: do these first (about 30 minutes)
- Birth certificates for everyone in the household
- Passports (photo page)
- Driver’s licenses and state IDs
- Social Security cards
- Marriage certificate
- Current health insurance cards
- Current medication list, allergies, immunization records
Tier 2: the ones that cost money if you can’t find them
- Homeowners or renters insurance declaration page
- Auto insurance declaration page
- Life insurance policies
- Flood insurance, if you have it
- Vehicle titles and registration
- Property deed or lease
- Mortgage statement
- Most recent tax return
Tier 3: the ones nobody thinks of until they need them
- Military discharge papers (DD-214), required for veterans’ benefits and burial honors
- Will, trust documents, powers of attorney, advance directive
- Divorce decree, custody agreements
- Pet vaccination records
- Warranties and receipts for high-value items
- A home inventory: film every room, narrating as you go and opening drawers. Ten minutes of video is worth thousands in a claim, and it needs to live somewhere that isn’t the house.
Keep the originals. Birth certificates, deeds, titles, and signed wills usually need the physical original for legal purposes, so those belong in a fireproof, waterproof safe. The scans are the copy you can send to a claims adjuster from a motel.
After the scanning
Mark the folder Keep Downloaded. Right-click your family-documents folder in iCloud Drive → Keep Downloaded. Cell service is the first thing to go in an emergency, and a document you can’t download is a document you don’t have.
Tell one other person how to reach it. An archive only you can open is a single point of failure in a convincing disguise. Our guide to what happens to a parent’s iPhone, Mac, and iCloud when they die is the long version of why, and setting up an Apple Legacy Contact is the fastest first step. Otherwise it means a shared iCloud Drive folder, a Passwords Shared Group, or a vault with real per-person permissions.
Start with Tier 1 tonight: seven documents, half an hour, and most of what a hospital, a school district, or a FEMA claim will ask you for.
Frequently asked questions
Where do scanned documents go on my iPhone?
Wherever the app you scanned from puts them, and never in Photos. A Notes scan stays inside the note itself, which also means it sits in an unlocked note, because Notes will not lock a note that contains a PDF. A Files scan becomes a real PDF in the folder you picked on the Save screen. If you have lost one, search Files by name and check Recents.
Can I scan documents on iPhone without downloading an app?
Yes, and you have more than one built-in option. Notes scans from the attachment button, Files scans from the More (•••) menu, and since iOS 26 the Preview app on iPhone scans, edits, and signs PDFs in one place. Third-party scanner apps mostly layer their own storage and processing on top of the same camera.
How do I scan multiple pages into a single PDF?
Keep scanning before you tap Save. In Notes and Files the scanner returns to the camera after each Keep Scan, so capture page two, page three, and so on, then tap Save once at the end to get a single PDF containing every page. Once the document is saved, tap it to add pages, crop, rotate, apply a colour filter, or delete a page. Apple documents those as edits to the saved scan rather than something you do mid-capture.
Why is Scan Documents greyed out or missing?
Usually something is blocking the camera, or you are in the wrong menu. Check Screen Time content and privacy restrictions and any configuration profile from a work, school, or previously managed device first. Then confirm you are tapping the attachment button in Notes or More (•••) in Files, since Apple warns that many Notes features do not work when the account belongs to another email provider.
Should I scan in Color, Black and White, or Text mode?
Color for anything carrying a seal, stamp, or signature, and Text or Black and White for everything else. Color preserves the marks that make a document look legitimate to an insurer or a registrar, at the cost of a much bigger file. Text and Black and White cut size the most, which is the fastest fix when a scan will not fit an email or portal limit.
Are iPhone scans searchable?
Assume they are not. Apple does not document scanned PDFs saved in Notes or Files as being OCR’d and indexed for full-text search, and users report inconsistent results. Live Text recognizes text in images, which is a different feature from a searchable PDF. Name the file properly instead, along the lines of Homeowners-Policy-2026.pdf, and let the file name carry the search.
More in this series: Can Family Sharing see your iCloud files? · What an Apple Legacy Contact can and cannot access · How to set up Medical ID and Emergency SOS · Activation Lock on a deceased owner’s iPhone
Sources: Apple: Scan documents on iPhone · Apple: Continuity Camera · Apple: Scan a document in Preview · Apple: Lock or unlock notes · Apple: iCloud data security overview