
This post contains affiliate links. If you buy through them, we may earn a commission at no extra cost to you. Read our disclosure.
Disclosure: This article contains affiliate links. If you sign up through one of them MacReview may earn a commission at no extra cost to you. We only recommend tools we’d use ourselves.
Apple has quietly built one of the better personal safety systems on the market into a phone most people use for email and podcasts: Medical ID, Emergency SOS, satellite messaging, Check In, Crash Detection, Fall Detection on the Watch. There are documented cases of each of them saving someone’s life.
Most of it requires setup, and that setup lives in menus you have no reason to open on an ordinary Tuesday. Here’s the full configuration, in priority order, in about fifteen minutes, plus the step almost nobody does: checking that it actually works.
1. How to set up Medical ID on iPhone: five minutes, highest value
Medical ID is a card paramedics can read without your passcode. It’s the closest thing to a wearable medical bracelet you already own.
Health app → Summary tab → tap your profile picture (top right) → Medical ID → Edit
Fill in: allergies and reactions, medical conditions, current medications and dosages, blood type, organ donor status, and, critically, emergency contacts.
Then turn on both toggles:
- Show When Locked. Without this, none of it is visible to a responder. This is the single setting people miss.
- Share During Emergency Call. Automatically sends your Medical ID to emergency services when you call or text 911 from an iPhone or Apple Watch. Apple limits the automatic share to the US and Canada.
That same Edit screen is where you set up emergency contacts on iPhone and where you go back to update an emergency contact later.
Do this on every family member’s phone, kids included. It’s the highest-return five minutes in this article.
2. Emergency SOS: two minutes
Settings → Emergency SOS
Two activation methods, and you should know which one your phone is set to before you need it:
- Call with Hold and Release: hold the side button and a volume button until a countdown starts.
- Call with 5 Button Presses: press the side button five times rapidly.
When it triggers, your emergency contacts are notified automatically and receive your location, with updates as it changes. Your Medical ID may be sent to responders.
Worth doing: try the button combination once, without completing the call, so your hands know it. The countdown gives you time to cancel. A safety feature you have to think about is one that fails under stress.
3. Emergency SOS via satellite: know whether you have it
On iPhone 14 and later, you can text emergency services with no cellular or Wi-Fi coverage at all, connecting directly to a satellite. It walks you through a short questionnaire and shares your location, battery level, and Medical ID with responders. It’s available across the US, Canada, Mexico, Australia, New Zealand, Japan, the UK, and much of Western Europe, though coverage depends on local regulation.
Do the demo. In Settings → Emergency SOS there’s a built-in satellite demo that teaches you the pointing motion: you have to aim the phone at the satellite, and it isn’t obvious. Two minutes in the driveway now, versus figuring it out on a mountainside.
On pricing: Apple’s support documentation states the service is free for two years after activation of an iPhone 14 or later. Per press reports, Apple has repeatedly extended that window rather than starting to charge (most recently for iPhone 14 and 15 in September 2025) and has never announced a price. Apple has never published an end date for those extensions, and outside reporting disagrees on when they run out, so check the current terms for your own device rather than assuming.
Different problem, worth one line: an iPhone showing SOS or SOS only in the status bar is a cellular signal issue, unrelated to any setting here.
4. Check In: the underused one
Check In (iOS 17 and later, on both ends) tells a chosen person you got somewhere safely, and if you don’t, it tells them where you are.
Messages → open a conversation → tap the (+) button → Check In → Edit
Two modes:
- When I arrive: set a destination, a radius, and travel mode (driving, transit, walking).
- After a timer: with 15, 30, or 60-minute extensions if you need more time.
If you don’t respond to the prompt, your contact receives either Limited data (current location, battery level, network signal) or Full data (all of that plus the route you traveled and where your iPhone was last unlocked). Set the level at Settings → Apps → Messages → Check In Data.
Teach it to a teenager, a partner working late, or a parent driving a long distance. If Check In isn’t working on your iPhone, start with the version requirement above: both people need iOS 17 or later for it to run at all. Note also that location sharing is unavailable in South Korea and may be restricted elsewhere.
5. Crash and Fall Detection: verify, don’t assume
Crash Detection is on by default on iPhone 14 and later (iOS 16+) and on Apple Watch Series 8, SE 2nd gen, and Ultra or later. After a severe crash it sounds an alarm, waits about ten seconds, and if you don’t respond within roughly thirty seconds it calls emergency services, plays a looped audio message, and shares your location. Verify it’s on at Settings → Emergency SOS → Call After Severe Crash.
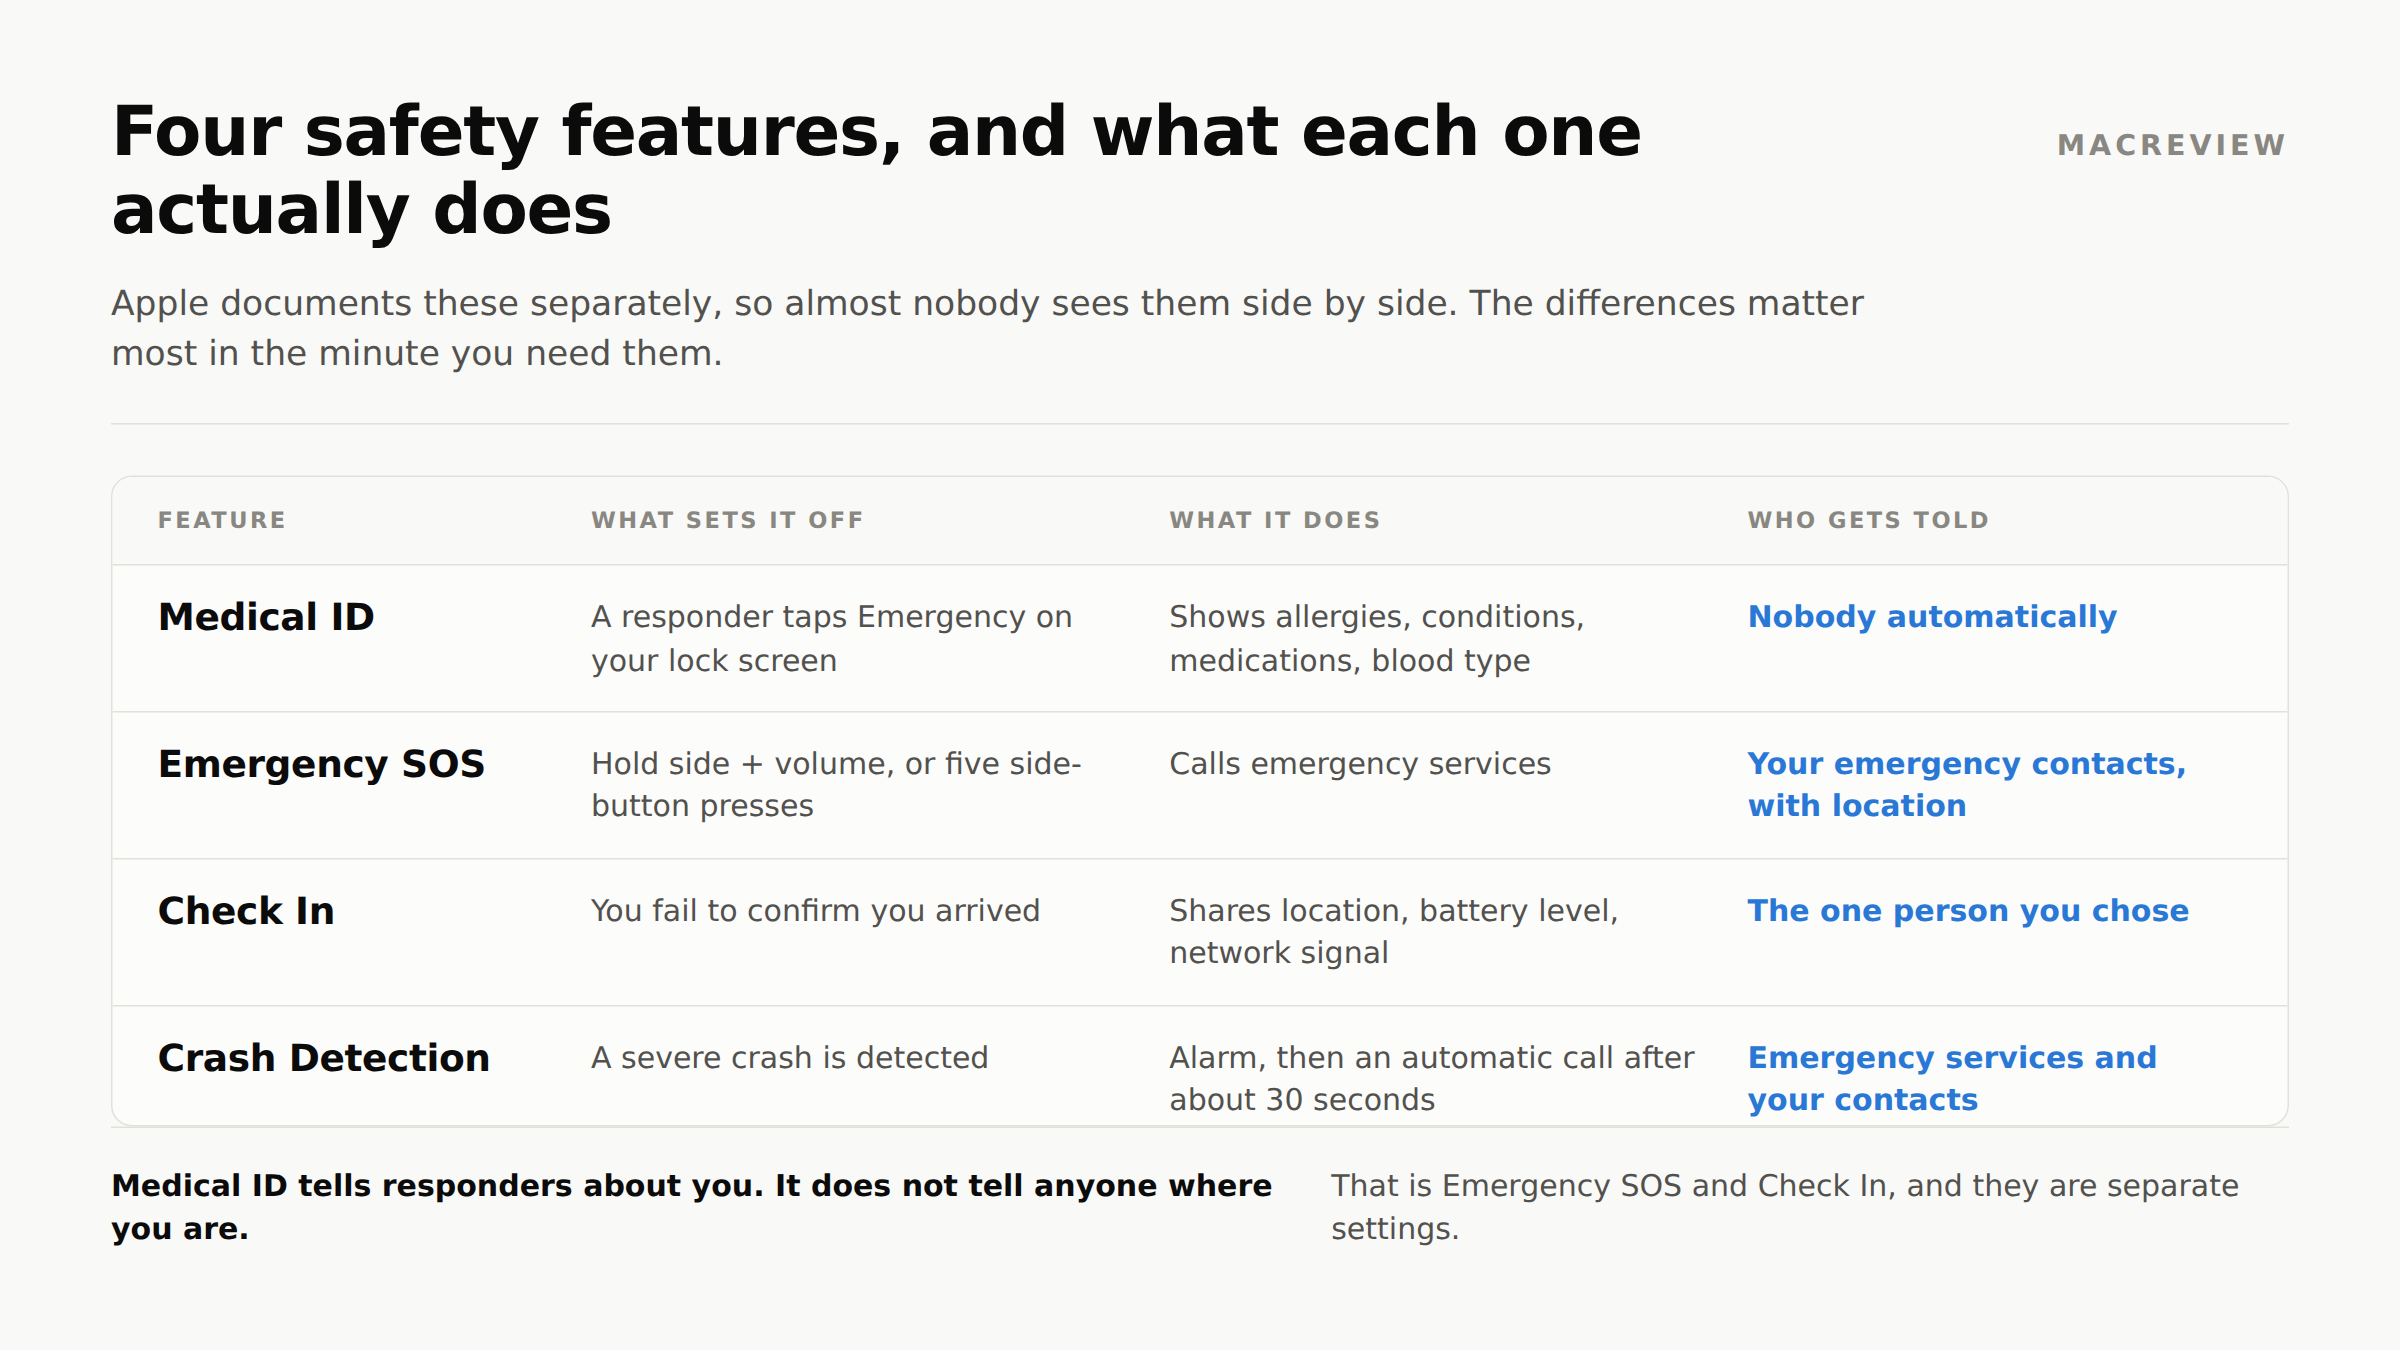
Fall Detection on Apple Watch is automatically enabled for users 55 and older, but only if the correct age is in the Health profile, which is exactly the kind of thing that gets skipped during setup on a watch bought for a parent. Check it: Watch app on iPhone → My Watch → Emergency SOS → Fall Detection, then choose Always on or Only during workouts.
If you set up an Apple Watch for an older relative, confirm their real date of birth is in Health. That one field decides whether the feature runs.
Tune it before you kill it. False alarms are real: roller coasters, motorsport, and heavy contact sport all set these systems off, and the usual reaction is to search for how to turn off Crash Detection entirely. That’s the worst fix available, because it’s permanent and you won’t remember to reverse it. Tune instead: set Fall Detection to Only during workouts if it fires during ordinary activity, pick whichever Emergency SOS activation method your hands are less likely to trigger in a pocket, and if you have a day booked at a racetrack, switch Call After Severe Crash off that morning with a reminder to switch it back that night.
6. Check your setup actually works
Nobody does this step, and it’s the one that tells you whether the last fifteen minutes counted.
Look at your own Medical ID the way a responder would. Nobody unlocks your phone in an ambulance. They reach the card from the locked device, through the Emergency option on the passcode screen, and how you get to that screen differs between Face ID models and models with a Home button. So do it yourself. On a Face ID iPhone, swipe up from the Lock Screen. On a model with a Home button, press the Home button. Either way you land on the passcode screen, where you tap Emergency, then Medical ID. If the card doesn’t appear, Show When Locked is off. That toggle is behind almost every case of Medical ID not showing on the lock screen. To read the card itself quickly, touch and hold the Health app icon on the Home Screen and choose Medical ID.
Confirm the emergency contacts saved. Go back into Health → your profile picture → Medical ID and check that each contact shows a name, a relationship, and a working number. Numbers go stale after a move or carrier switch, so re-read the list once a year. Then tell those people they’re on it, because a contact who ignores an unknown number at 2am is not a contact.
Setting this up on an aging parent’s iPhone
The people who benefit most from this are the least likely to have configured it, and the results for senior safety are dominated by companies selling a second device to wear. If your parent already carries an iPhone, much of that hardware is redundant.
Do it sitting next to them, on their phone, in one pass:
- Medical ID first, and take the medication list off the actual bottles rather than from memory. Dosages are the part responders want.
- Emergency contacts should include at least one person who isn’t you, ideally someone who lives close by.
- Check the date of birth in the Health profile. As above, Fall Detection enables itself for users 55 and older only when the correct age is there, and a watch set up in a hurry by a relative very often carries a placeholder birthday. This is the most commonly broken link in the chain.
- Practice the Emergency SOS combination together once, so it’s muscle memory.
Then have the conversation the features don’t cover. Setting up a Legacy Contact on their Apple Account takes two minutes while they’re able to do it; the alternative is Activation Lock on a deceased owner’s iPhone, which is months of paperwork and sometimes a court order.
What none of this covers
Every feature above is built for the first sixty minutes of an emergency: get help to you, tell the paramedic about your penicillin allergy, notify the people who love you. Apple has done that job well.
What follows the first sixty minutes is paperwork, and Apple has built nothing for it.
- The hospital wants insurance information and a healthcare proxy.
- The school won’t release your child to a relative without documentation.
- FEMA or your insurer wants proof of ownership, policy numbers, and an inventory of what you lost.
- If you evacuate, you need your kids’ immunization records to enroll them anywhere.
None of that is in Medical ID, which holds a medication list but not your insurance card, your advance directive, or your homeowners policy.
Two things close the gap, and both are boring:
Scan the documents. Your iPhone’s built-in scanner produces clean PDFs in seconds, and we cover every method in our complete iPhone document scanning guide. Half an hour of scanning covers most of what anyone will ask you for.
Store them where they survive the emergency and reach the right people. Not on the device that might be underwater, and not behind a password only you know. Our guide to what iCloud protects and who can see it covers what iCloud does and doesn’t handle: iCloud Drive is solid storage with Advanced Data Protection turned on, but it has no per-document sharing and no offline guarantee unless you’ve marked a folder Keep Downloaded.
For households where somebody else may need to act (a partner, an adult child managing a parent’s care, a co-parent across town), Trustworthy is the piece we’d add. Two features matter specifically in an emergency: mobile offline mode, so documents are readable when networks are down, and per-item permissions, so the person who needs your insurance declaration already has it. It’s SOC 2 Type 2 certified, with AES-256 encryption and MFA required by default. The free tier is single-user with 2 GB; shared access starts at $10/month billed annually.
The fifteen-minute version
If you do nothing else this week:
- Medical ID, with Show When Locked and Share During Emergency Call both on (5 min)
- Emergency contacts in Medical ID (2 min)
- Confirm your Emergency SOS activation method and practice it once (2 min)
- Run the satellite demo if you have an iPhone 14 or later (2 min)
- Verify Fall Detection on any Apple Watch belonging to someone over 55 (1 min)
- Scan your insurance cards and medication list into Files, or into a vault someone else can reach (3 min)
Then check it from the lock screen, the way a stranger would.
Then do the same on your partner’s, kids’, and parents’ phones. These features only work on the device that’s with the person having the emergency.
Frequently asked questions
My Medical ID is not showing on the lock screen. Why?
Nine times out of ten, Show When Locked is switched off in Health → Medical ID → Edit. The other usual causes are a card filled in but never saved, and a phone restored from a backup made before the Medical ID existed. Share During Emergency Call is a separate toggle, and Apple’s own setup instructions have you switch on both it and Show When Locked for first responder access. Turn both on rather than trying to work out which one the lock screen depends on. To check, bring up the passcode screen and look for Emergency, then Medical ID. Swipe up from the Lock Screen on a Face ID iPhone, or press the Home button on a model that has one.
How do I add or update an emergency contact?
Go to Health → your profile picture → Medical ID → Edit and add, change, or remove entries under Emergency Contacts. These are not your Favorites, so adding someone to one list does nothing for the other. Each entry carries a relationship label, which is what a responder reads first, so set it rather than leaving it blank.
Why does Check In say “not available”?
Almost always a version mismatch: Check In needs iOS 17 or later on both phones, not just yours. It also lives inside Messages, so it will not offer itself in a conversation with an Android user. Location sharing is unavailable in South Korea and can be restricted elsewhere, which produces the same greyed out result.
How do I stop my iPhone calling 911 by accident?
Change the activation method rather than turning Emergency SOS off. In Settings → Emergency SOS you can pick Call with Hold and Release or Call with 5 Button Presses; whichever one keeps firing in your pocket, switch to the other. If a countdown does start, cancel it before it completes rather than hanging up mid call.
Should I turn off Crash Detection?
No. It is on by default on iPhone 14 and later, and switching it off permanently is the fix people regret, because nobody remembers to reverse it. If you have a day booked at a racetrack or a theme park, turn Call After Severe Crash off that morning at Settings → Emergency SOS, with a reminder to turn it back on that night.
Does Emergency SOS work with no signal?
Yes, on iPhone 14 and later, using Emergency SOS via satellite. You need a clear view of the sky and you have to aim the phone, which is why the built in demo in Settings → Emergency SOS is worth two minutes now. On cost, Apple documents two years free after activation and has extended that window since; the terms are in flux, so check what currently applies to your device.
More in this series: Can Family Sharing see your iCloud files? · iPhone document scanning, and where scans actually save · What an Apple Legacy Contact can and cannot access · Activation Lock and a deceased owner’s iPhone: what families face
Sources: Apple: Set up Medical ID · Apple: Emergency SOS via satellite · Apple: Use Check In · Apple: Crash Detection · Apple: Fall Detection
Dev note: Article and BreadcrumbList only. Do not add HowTo or FAQPage schema; Google deprecated HowTo rich results in September 2023 and FAQ rich results for sites like ours. The Frequently asked questions section is kept for readers and AI answer engines, not for rich results.