Whether you’re preparing to sell, trade in, or give away your Mac, or simply need a fresh start, resetting your MacBook or Mac desktop can clear out data and ensure that the device is ready for its next phase. Depending on your model and the macOS version you’re running, resetting can involve a few different steps. Recent macOS releases like Sequoia and Ventura offer a simplified reset process similar to iOS, while earlier versions require a more hands-on approach. This guide covers all you need to know, from backing up data to securely wiping your Mac.
Preparation: Backing Up and Signing Out of Accounts
1. Create a Fresh Backup
Before resetting, make sure you have a complete backup. Apple’s Time Machine is the easiest way to back up your Mac, allowing you to restore files and settings later. To back up with Time Machine, connect an external hard drive, go to System Preferences > Time Machine, and select Back Up Now. For other backup options, consider third-party cloud services like iCloud or Dropbox.
2. Sign Out of iCloud, iMessage, and FaceTime (macOS Big Sur or Earlier)
If you’re using macOS Big Sur or an earlier version, you should sign out of iCloud, iMessage, and FaceTime to ensure your data isn’t accessible after the reset. Go to System Preferences > Apple ID > Overview > Sign Out. For iMessage, open the Messages app, go to Preferences > iMessage, and sign out.
Resetting Your Mac by macOS Version
macOS Sequoia, Sonoma, and Ventura: Using the New Erase Option
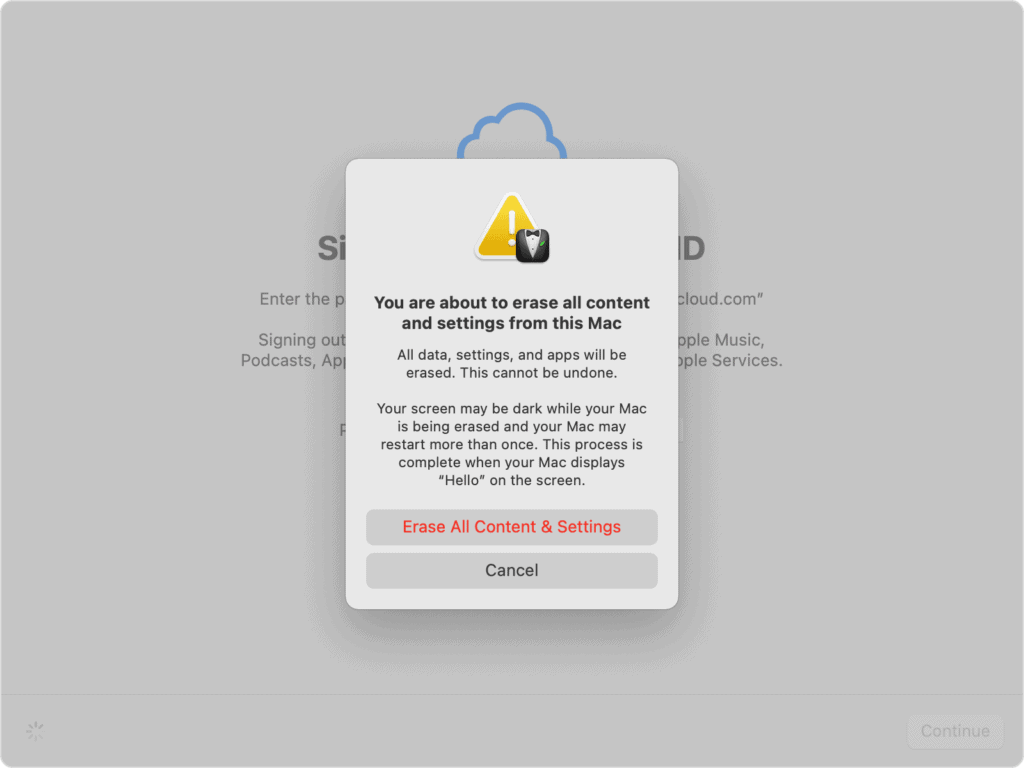
The latest macOS versions make it easy to erase all content and settings:
- Open the System Settings app.
- Select General from the sidebar.
- Click Transfer or Reset and choose Erase All Contents and Settings.
- Enter your password if prompted, then follow the on-screen instructions to complete the reset.
Shortcut: You can also use Spotlight Search (cmd + space) to find “erase” and jump straight to the reset options.
macOS Monterey: Using Erase Assistant
For Mac models from 2018 or later running macOS Monterey, Apple introduced Erase Assistant, similar to the reset process on iOS.
- Back up your Mac as described above.
- Go to System Preferences.
- In the System Preferences menu, click Erase All Contents and Settings.
- Follow the prompts to reset your Mac. The current version of macOS will remain installed, so you won’t need to reinstall it after resetting. Tip: Apple’s Erase Assistant handles the entire process, wiping data and removing personal settings while keeping the OS intact.
Resetting Macs on macOS Big Sur or Earlier
Step-by-Step Process for a Complete Reset
- Backup and Sign Out: Back up your Mac and sign out of iCloud, iMessage, and FaceTime, as outlined in the preparation section.
- Reset NVRAM (Intel Macs without T2 Chip):
- Shut down your Mac.
- Hold down Option, Command, P, and R as you power it on, and release after 20 seconds.
- Enter macOS Recovery Mode: Depending on your Mac’s processor, this can vary.
Booting into macOS Recovery Mode
- Apple Silicon Macs:
- Shut down your Mac.
- Press and hold the power button to turn it on, continuing to hold until the startup options appear.
- Select macOS Recovery and follow the prompts to reinstall macOS.
- Intel Macs: Use one of the following key combinations as you power on your Mac:
- Command + R: Reinstalls the latest version of macOS previously installed.
- Option + Command + R: Installs the latest compatible macOS.
Note: For OS X El Capitan or earlier, Apple recommends using Option + Command + R to ensure the installation isn’t tied to your Apple ID.
Erasing Your Startup Disk
Once in macOS Recovery Mode:
- Select Disk Utility in the macOS Utilities window, then click Continue.
- In the Disk Utility sidebar, select your startup disk (usually labeled Apple SSD or Macintosh HD).
- Click Erase, then set the format to Mac OS Extended (Journaled) or APFS, depending on your setup.
- Confirm by clicking Erase. Once complete, close Disk Utility to return to the macOS Utilities window.
Reinstalling macOS
- In the macOS Utilities window, click Reinstall macOS.
- Follow the prompts to choose the drive and install the OS.
- Plug in your Mac’s power cable, especially if using a laptop.
- Installation Time: SSDs may take 10-20 minutes; HDDs can take longer.
After the installation, you’ll see the welcome screen. If you’re keeping the Mac, continue with the setup process. If giving it away, press Command + Q to quit the setup assistant and power it down.
Additional Resources for Apple Silicon Macs: Revive and Restore
If your Apple Silicon Mac won’t start up, you may need to use the revive or restore process. Check Apple’s official support guide for detailed instructions on how to use Apple Configurator 2 to revive or restore a Mac in these situations.
Resetting Your Mac the Right Way
Resetting your Mac, whether to sell it or just start fresh, can be straightforward when you follow the right steps. Be sure to back up your data, sign out of essential accounts, and use the correct reset method based on your macOS version and Mac model. iOS-style reset options in recent macOS versions simplify the process, making it easier than ever to securely wipe data. With these steps, you can confidently reset your Mac and ensure it’s ready for a new beginning.


